The curve tool is one of the most powerful yet underestimated tools -
not overly loved by many because it is delicate to handle and
unforgiving
to usage errors.
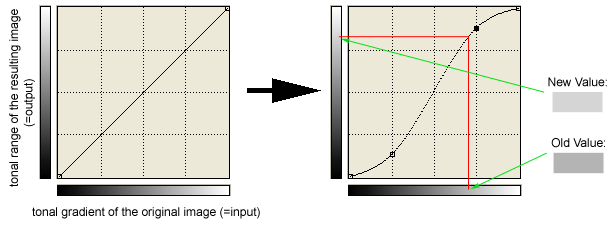
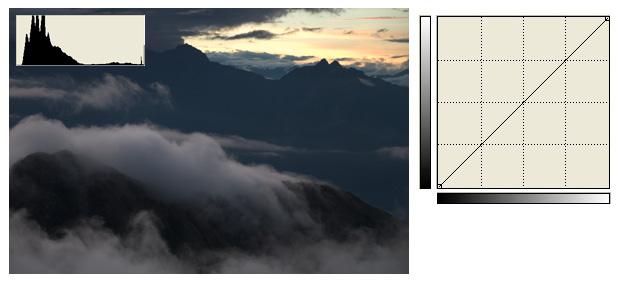
In its default RGB presentation (shown to the left below) the "curve"
is a line
with fix points to the lower left and the upper right. To the left and
bottom of
the curve canvas you can find gradient bars ranging from deep black
to bright white. The bar to the bottom represents the image as is
(input) whereas the left bar shows the output range. The "curve"
defines the relationship between input and output. If we match the two
end points of the line with the gray value
of the gradient bars it becomes obvious that the lower left point
represent the black point of the image whereas the upper right point is
the white point. The line/curve represents the transition between the
two.
If you move your mouse pointer on the line you can click and drag the
line off its center position and move it to either direction. Doing so
you will change the image. If you release the curve
you´ve created an anchor. You can repeat the procedure and
introduce more anchors. You can move all anchors including both black
and white point. The tool will create a smooth curve touching all
anchors (-> therefore "curve" tool).
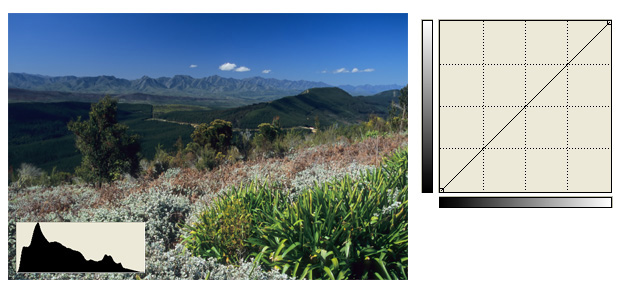
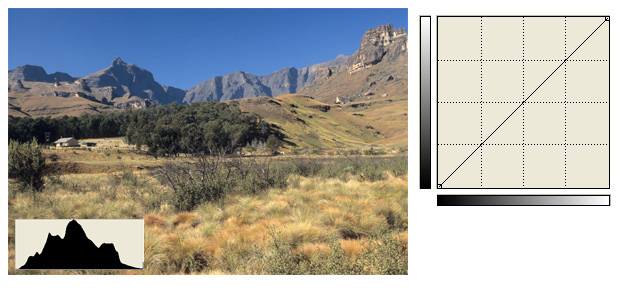
The default diagonal line will create an image identical to the
original one. If you move a point off its center position its output
luminance will change compared to its original value (see the sample
point in the right image below).
The sample illustration below shows a sample transition to an "S"
formed
curve which we´ll discuss later:
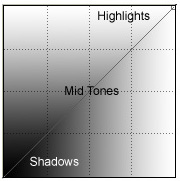
Similar to the histogram we can divide the diagram into three luminance
classes:
Dos and Don´ts ...
For the vast majority of applications there´re three things you
shouldn´t do with the curve tool ....
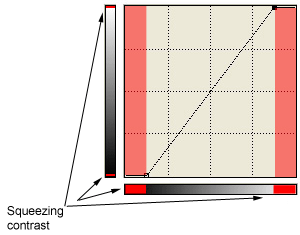
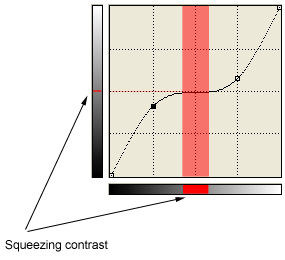
- Squeezing a tonal range
If you tune a local part of the curve to a degree where it is almost
horizontal you´ll lose (virtually) all contrast in this section.
You can do so ...
a) by moving the white and/or black points towards the horizontal
center cutting off highlights (towards white) and/or shadows (towards
black). In other words: you´re potentially loosing dynamic
range by doing so. This resembles a little bit to setting a new white
and/or black point in the histogram tool but it´s far less
accurate because the curve tool will give you no representation of the
actual distribution of the tonal range. You may running into a clipping
situation without knowing about it.
b) by creating a curve with very flat horizontal turning point you
loose most local contrast in that range.
You may notice that a rather broad tonal range on the input side (on
lower
gradient bar marked in red) is squeezed to a tiny range or point on the
output side
(left gradient bar).
- Bloating tones
It's also possible to do
just the opposite of squeezing contrast - you can tune a part of the
curve
to a very flat vertical layout where a tiny input portion will be
bloated out on the output side thus generating a broad range with very
poor tonality/smoothness.

- Reducing contrast
by moving the black- and/or
white point on the Y-axis. Usually
that´s not a good idea though because
you´ll loose deep blacks and/or bright whites - the tonal range
will be compressed into the new reduced representation.
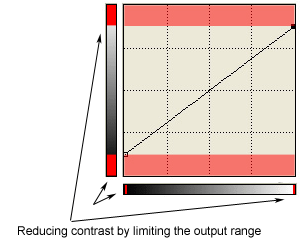
As a consequence you should
have set
up both black and white points appropriately BEFORE using the curve
tool.
Naturally there may be situations where is makes sense to use the curve
tool as mentioned above but for most mortals this is meaningless.
Ok, I guess understanding the usage principal is easy. Now let´s
have a deeper look at the concept ...
Brightness
Changing image brightness is a pretty easy task - just push the
line off "away" from the shadows by dragging the line into the upper
triangle. By doing so you increase the relative share of bright image
regions.
Typically you want to do so for the mid tones which means to
create a new anchor at the center point of the curve (initially a line
here). For a roughly symmetrical effect (similar degree of brightening
for dark and bright image portions) you drag this anchor towards the
upper left hand corner.
Naturally it works the other way round if you want to lower the mid
tone brightness.
| Move
mouse cursor over the buttons below this illustration to
change image brightness
|
|
|
|
You may notice that the inner portion of the histogram changes
accordingly. However, both white and black point remain static. In
other words: you will not run into a clipping situation using the curve
tool - you will NOT change the dynamic RANGE but simply the brightness.
Dependent on the position of your anchor you can also recover
highlights or shadows - more on this later ...
Contrast
Image contrast is also represented by the curve. In its initial
position the line/curve represents the given contrast "as is" - the
tool will not show you whether the absolute contrast is harsh or smooth.
If we want to increase the contrast of an image we need to
increase
the gradient of the curve (and vice versa). How can we do that ?
Not thinking about the consequences we could move the black point
straight to the right and the white point to the left - this will
easily increase the gradient of the curve. HOWEVER, as a result we will
loose all image data in the very bright and very dark image portions -
this is mentioned in the "Dos and Don´ts above. So that´s
no good.
As an alternative we leave both black and white point at their initial
positions and create two new anchors - one near the lower left (A) and
one
near the upper right (B). By moving (A) downwards (towards shadows) and
(B) upwards (towards highlights) we create a curve similar to an
abstract "S". In the sample illustration below you may notice that the
center portion of this "S" has a
steeper gradient thus a higher contrast - we increased mid
tone contrast and decreased shadow and highlight contrast. Visually the
latter are far less significant though. Nonetheless we didn´t
really destroy much of the tonality here which is also visible in the
histogram - specifically there´s no clipping when increasing
contrast using the "S".
This may sound very theoretical again so I encourage your to have a
look at the illustration below - it´s not all that difficult.
| Move
mouse cursor over the buttons below the illustration to
change image contrast
|
|
|
|
Those veterans from the analog era may recognize the "S" curve from
film data sheets. Image sensors produce a linear relationship between
the real world and the tonal range of an image whereas film behaves
like an "S" curve. If you want your digital image to look similar to
film you may simply apply the S curve in the curve tool - if
you´re shooting in JPEG mode the camera will already apply this
modification to some degree for you but in RAW mode you´ve to do
that yourself.
Highlight-/Shadow-Recovery
Sometimes the dynamic range of a scene is quite extreme resulting
in blown out highlights or deep dark shadows. If you worked in RAW mode
there´s a good chance that you can rescue your image (due
to the vastly superior dynamic range compared to JPEG).
If you understood changing image brightness you should already
have the craftsmanship
to recover the effected image portions. Recovering highlights means
nothing else than reducing brightness within the LOCAL highlight
portion of the curve and vice
versa for shadows.
The only problem is that you don't really want to affect mid tone
contrast as well as deep blacks and whites. You can "secure" these
areas by introducing supporting anchors here minimizing significant
luminance changes
here.
| Move
mouse cursor over the buttons below the illustration
|
|
|
|
You may notice that the sky and cloud portion gets slightly darker
whereas the shadows recover a little - it's actually quite a bit more
obvious in the full scale image. The change is also visible in the
histogram where local parts at the extreme ends move towards the mid
tones.
|