EXPOSURE CORRECTION
Approved translation of the original
(German) text from Marco Silbernagel. Some enhancements plus style changes by Klaus Schroiff.
Topics:
Exposure Value (EV)
The "Exposure Value" (EV) is the common
unit to explain exposure differences so it's useful to understand its concept.
In simple words: 1 EV difference is identical with either +-1 f-stop or
the half or double shutter speed.
Example:
The camera meters something like 125s
at f/8.
If you correct the setting by +1 EV this
can mean 1/60s at f/8, 1/90s at f/6.7 or 1/125s at f/5.6 (based on half
stop steps). At either setting the lens will transmit the double amount
of light to the film. Furthermore 1/125s at f/8 has the same EV like 1/90s
at f/9.5 or 1/60s at f/11. The amount of light transmitted to the film
remains the same in all these three samples here.
Modern SLRs cameras offer at least possible
corrections in 1EV steps, half steps are standard and third steps are a
common option in pro cameras. Back in the old days when camera had no internal
metering sensors a photographer had to use an external light meter which
show also the absolute EV, like EV 6, to provide information about the
light situation - EV 0 means 1 sec at f/1.0 here.
The 3 major Auto Exposure
Programs:
-
Program (P) - The camera suggests a shutter
speed/aperture combination based on the chosen focal length. Some of the
smarter camera models allow to "shift" the program ( changes the setting
to the next nearest shutter speed/aperture setting. The exposure value
(EV) remains unchanged ). A "P" program without Shift mode cannot be used
for more than just P&S - including Shift it is a good general purpose
program.
-
Shutter Priority - This program is targeted
for Action photography where you want to insure that you have a fixed shutter
speed e.g. in order to prevent blurred images. The camera cares about an
appropriate aperture setting here. The exposure value (EV) remains unchanged
again.
-
Aperture Priority - This is usually used to
control DOF ( Depth-of-Field ) - portraits may
be a good application for this program. The camera automatically cares
about the appropriate shutter speed. The exposure value (EV) remains untouched
again here.
There's no uniform naming convention in regard
to these programs. The "Program" mode is usually designated with a "P"
but the sign for shutter and aperture priority differs between the manufacturers
(T, Tv, S, A, Av etc. pp.). Look into the manual to find out the representation
in your world.
The story behind exposure correction
The exposure meter of today's SLRs measure
the amount of light (and sometimes also the color) reflected from a scene.
This metering is usually done Through-the-Lens (TTL). This works pretty
good for most of the time but there're several situations where the limit
of the method is exceeded.
The metering sensor is calibrated to provide
appropriate exposure settings for a scene which reflects light "like" 18%
gray. What does that mean ? Have a look outside your window: e.g you may
see some red cars which reflect light like 12% gray, the blue sky (5% gray),
grand mother's doberman (80% gray), the next house with some white walls
(0-5% gray) etc. pp. If you average all these values you'll quite often
end up with a scene that reflects light around 18% gray. If this averaged
value is different we have a problem. This is the reason for the various
metering modes of a camera. e.g. multi-segment metering systems try to
emphasize certain areas in the scene to overcome the 18% gray restriction
- with often limited success. Via spot metering you can be the one who
selects a typical part of the scene that resembles pretty much this gray
value. Have a look at the following chart. All these colors reflect light
like 18% gray:
It's quite amazing that these colors look
so dark, doesn't it ? However, you have to be aware that there're usually
lots of shadows in a scene so the average reflection rate is not as high
as you "feel" it - the human brain is pretty smart in correcting light
differences.
Please note that many metering sensors
have color preferences - e.g they may receive red light in a different
intensity than blue light. In the real world it usually doesn't make a
big difference but you have to be careful in regard to color filters for
B&W photography. For example: my EOS 5 is relatively blind for reds
and using a red filter with this camera will end in underexposed pictures.
This is no big problem though. Just meter a scene with and without filter
and check the difference with the correction factor given by the filter
manufacturer. Compensate the difference between these values and life is
cool again.
If we've only an intergral metering sensor
or we simply cannot use spot metering for whatever reason we run into problems
in scenes with an average reflection rate which differs significantly from
18% gray - resulting in under- or overexposed pictures. This is where manual
exposure correction enters the game.
Table with typical
exposure correction directions for difficult light situations:
| Typical under-exposed Scenes [ many bright spots (>18% reflektions)] |
Exposure correction direction |
| Contra-light or related light situations |
Plus (+) |
| dominant white or yellow areas |
| Sunset/Sunrise |
Typicalover-exposed Scenes
[ many dark spots (<18% reflektions)] |
Exposure correction direction |
| Scenes with dark green like a forest |
Minus(-) |
| dominant shadows |
| dominant dark objects |
| Example: Object with many bright spots (> 18% Reflection) |
| 
|
| without exposure correction |
+ 1 EV correction = longer exposure |
| Example: dark main object(< 18% Reflection) |
| 
|
| without exposure correction |
- 1 EV correction = shorter exposure |
Reflections of the metered main subject
                      more than 18%: under-exposure --> Plus (+)
                 •--- corrections ( snow pics, close ups of white/yellow
                 |    subjects, contra-light, etc. )
                 |
Reflection rate  |
  of the     ----•--- 18%: optimal exposure
main object      |
                 |
                 |    less than 18%: over-exposure --> Minus (-)
                 •--- corrections ( dark greens (forest), shadows, etc.)
The right Amount of Exposure Correction
It's a bit tricky to choose the right amount
of exposure correction - finally nothing else than experience will help
here. The "severity" of the problem is also dependent on the chosen film
type. Slide film is extremely sensitive, a difference +/-1 EV off the exact
exposure is already over the edge for most situations here. Print film
is much more tolerant. It (or to be precise: the lab) can easily compensate
up to +-2 EV without any big impact on the final result. However, playing
around with light moods is much more difficult - especially because the
labs always try to compensate exposure variations.
Here some rules of the thumbs for a couple
of difficult light situations based on a normal center-weighted metering
system (does not apply for matrix or spot metering):
-
Bright scenes at a sunny day: 0 to +3 EV
-
Snow or shining water surface: +2/3 to +3
EV
-
Close-ups of bright subjects: +1/3 to +1 2/3
EV
-
Dawn: 0 to +2 EV
-
Landscape with lots of shadows or direct light:-2/3
to 0 EV
-
old steam trains (black): -1 1/3 to -2/3 EV
Several cameras show the decimal value of
correction on an external LCD display and/or the viewfinder. These values
are equivalent to the following correction factors in EV:
| displayed
values |
-1 |
-0.7 |
-0.5 |
-0.3 |
0 |
+0.3 |
+0.5 |
+0.7 |
+1 |
| corresponding
EV |
-1 |
-2/3 |
-1/2 |
-1/3 |
0 |
+1/3 |
+1/2 |
+2/3 |
+1 |
No clue ? Try Exposure Bracketing
Usually the direction for the exposure
correction is pretty easy but setting the right amount is often difficult.
Just take a simple sunset - finding the exact setting requires some experience
here and even then you may like to take some additional pictures with different
EVs just to see which exposure shows the best mood.
This can be done manually or a bit faster
and more convinient via auto exposure bracketing by the camera. "ABC" (Auto
Bracketing Control), "AEB" (Auto Exposure Bracketing) is featured by many
mid and upper class cameras. Usually you just need to activate this feature
and set a certain shutter speed/aperture combination and your camera will
automatically take 3 to 5 pictures with defined exposure variations.
There aren't too many magic moments out
there and better invest in burning film via bracketing instead of wasting
one shot with an incorrect exposure.
 |
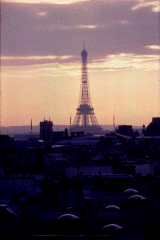 |
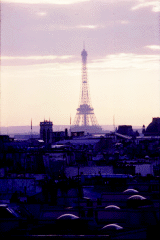 |
-1 EV
(under-exposure, here: skyline effect) |
no correction applied |
+1 EV
(over-exposure) |
Available Light
Night or available light situation
usually suffer from extreme contrasts between dark and very bright spots
(like street lights). These spot lights often confuse the metering sensor
because it only takes an averaged sample of a certain picture area. A correct
exposure is pretty tricky here and often quality comes only with experience.
Based on an ISO 100 film at f/2 the following
shutter speeds may offer some rough rules for some available light situations.
Theater, football stadion (w/spot lights)................:  1/60s
Circus...................................................:  1/30s
Museum, good illminated expositons.......................:  1/15s
In-door shots (artifical light source), camp fire .......:  1/8s
Candle light, christmas tree.............................:  1/4s
weak illuminated town/street scene (at night)............:  2s
Snow landscape at full moon..............................:  10s
Normal landscape at full moon............................: 20s |


